Abstract
Reticulum is the cryptography-based networking stack for building local and wide-area networks with readily available hardware. Reticulum can continue to operate even in adverse conditions with very high latency and extremely low bandwidth. With this portable server you can build an ad-hoc Reticulum network. Clients can connect to this network via Rnode, LAN or wifi. When the server can connect to another Reticulum network via Rnode or LAN this wider network becomes available for the clients to use. A GPS receiver keeps track of the time and location. An NTP server distributes the time over the ip network. Two APRS transceivers (1200 bd on 2 meter and LoRa on 70cm) can connect to local APRS networks. The APRS modems can be reconfigured to be used as Reticulum links.

Why do you need Reticulum?
The internet is always available, right? But what if it is not? In case of an emergency it could be helpful to deploy a local network for communications. Reticulum can do that better than ip can. It can run over almost all data links, be it high speed ip or low speed LoRa, even old school packet radio networks or plain old copper can be used. It is very robust and is encrypted: not by default, but it’s the only available option.
What can you do with it?
With the available chat app, users can send messages to each other via ordinary smartphones over wifi of rnode modems connected via Bluetooth. If a user is temporary unavailable, the network stores the message until the user is available again. It is also possible to send images and files over the network with the same app. There are also applications for computers which can do the same.
Simple text based website (nomad network nodes) can be made to distribute information and it is even possible to make calls.

Source: https://reticulum.betweentheborders.com/primer.pdf
Portable Reticulum server
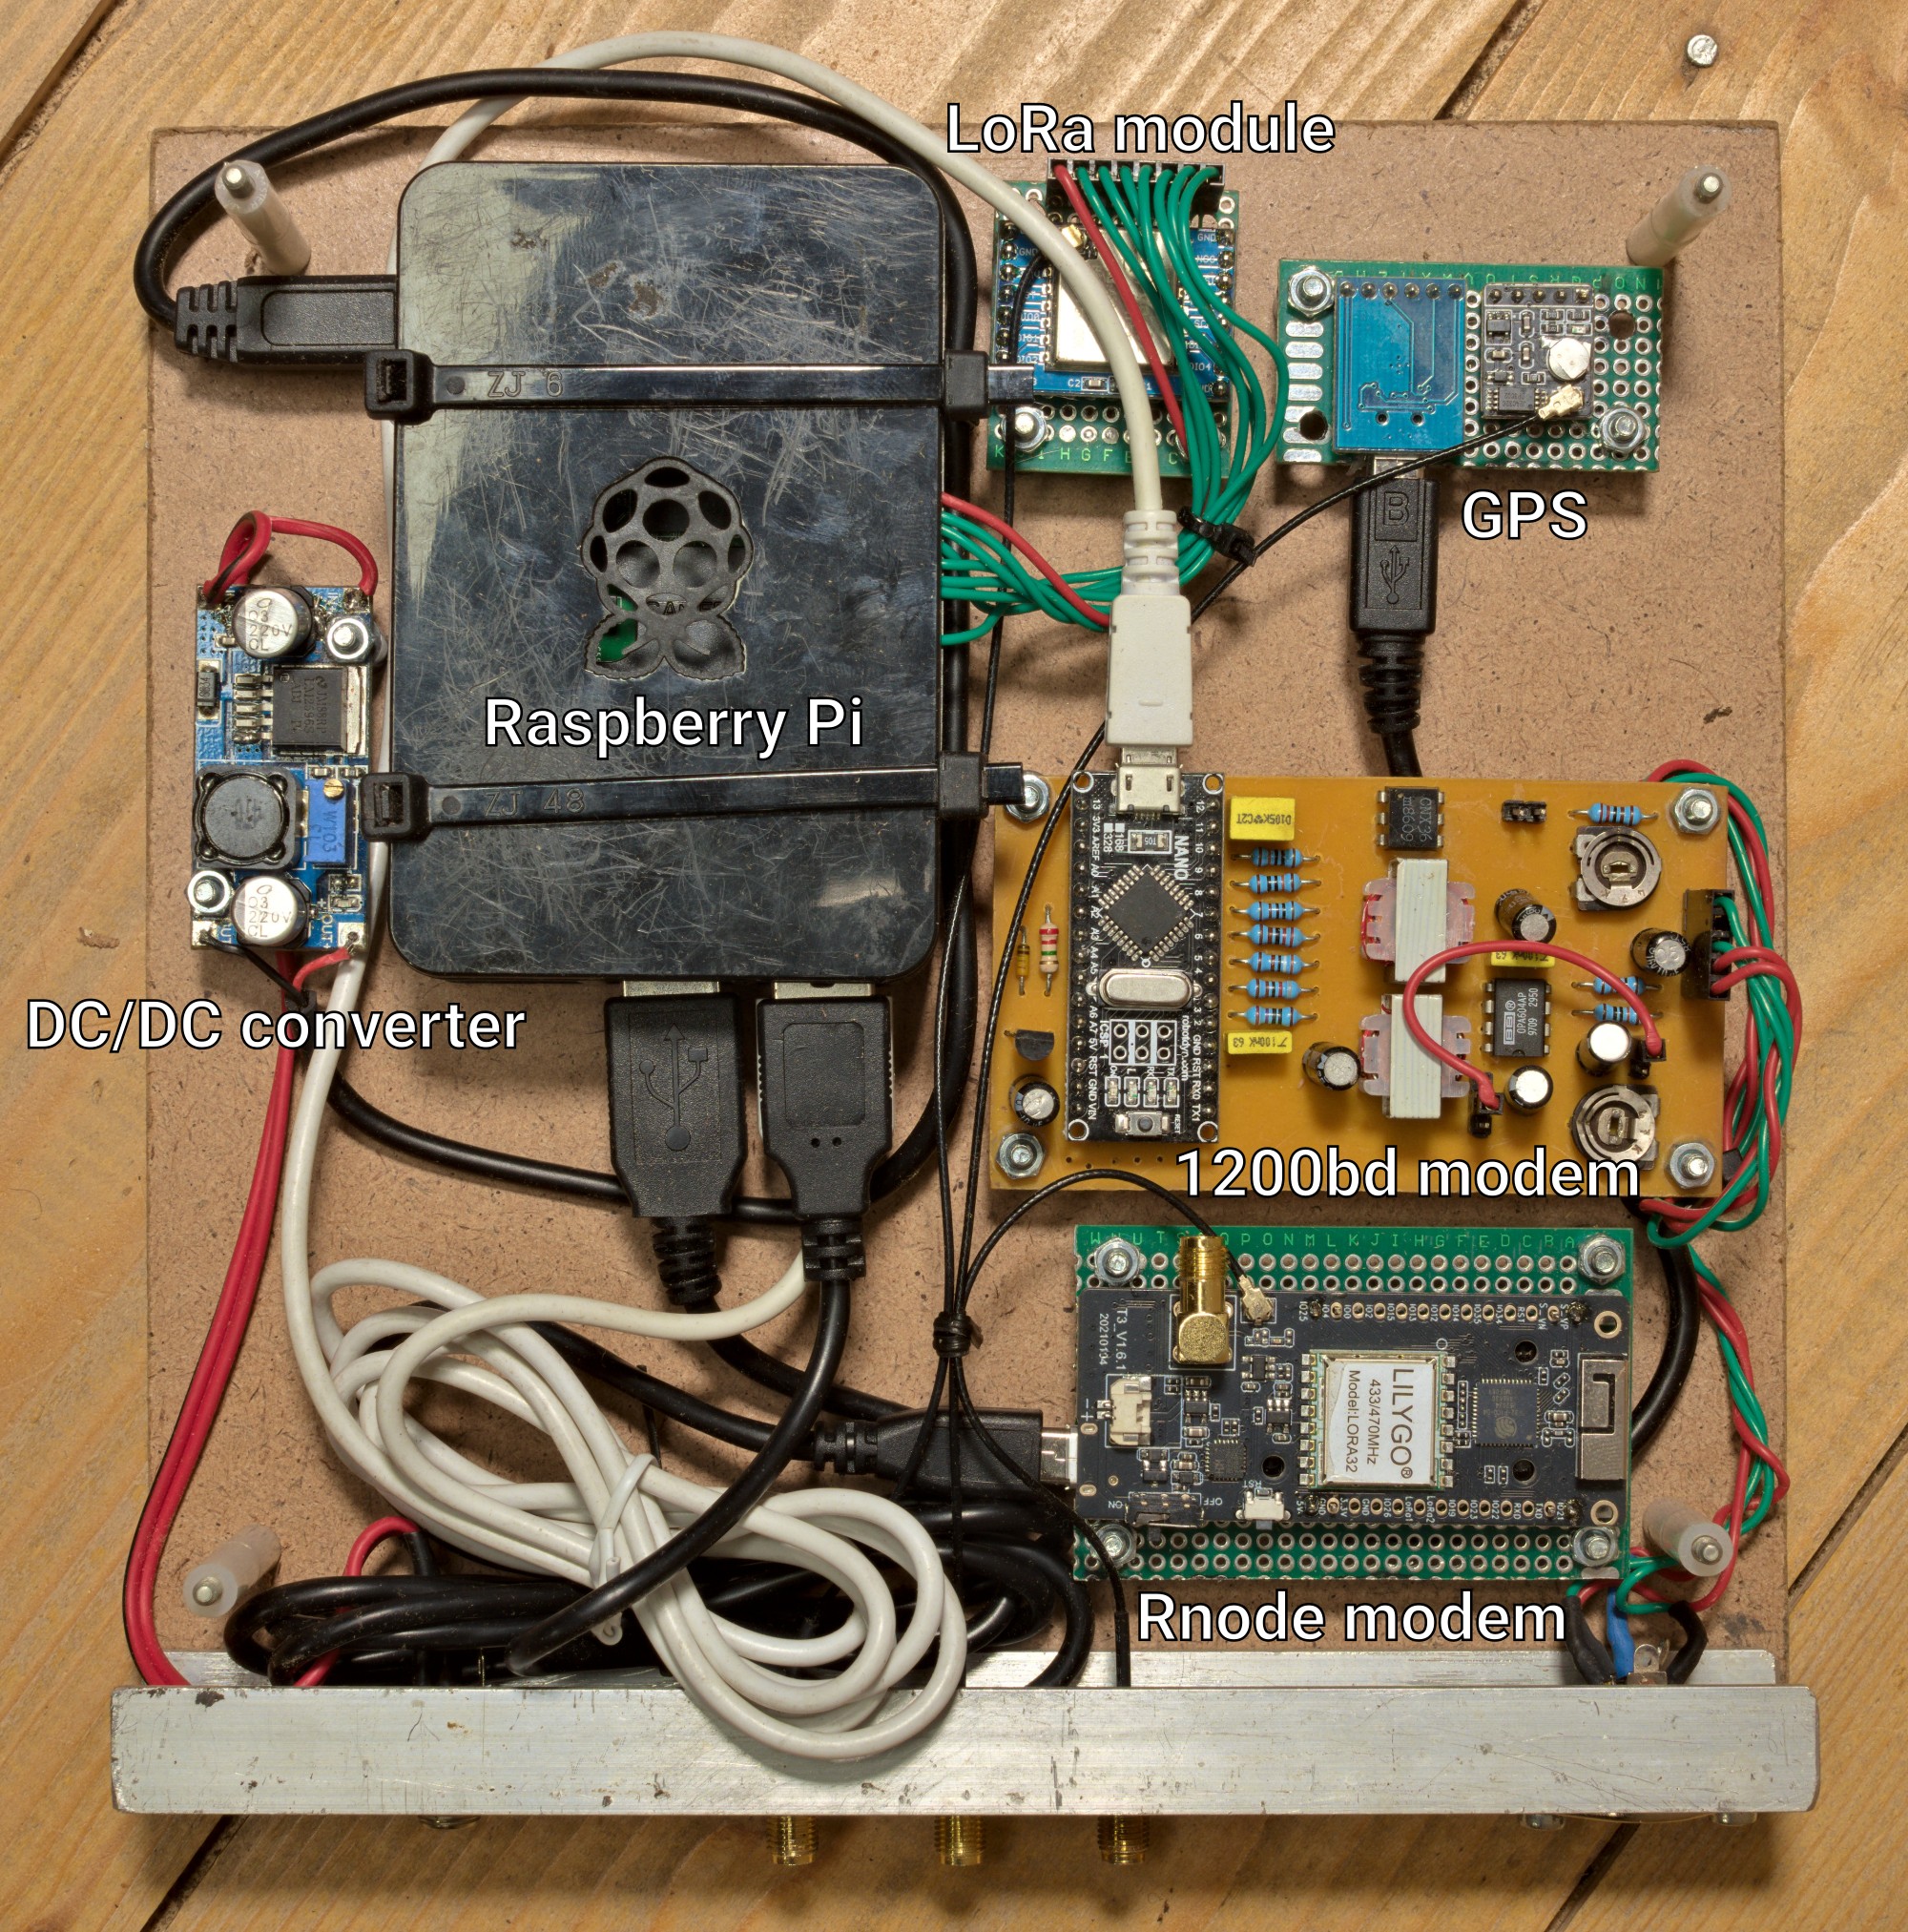
To experiment with Reticulum in the field, I decided to build a portable Reticulum Network Server. My goal was to make it universal and easy to use. Just plug it in and it should make a Reticulum network available via rnode, LAN and wifi. If it can connect to another server it should do so. And because Reticulum is not widely available yet, it should have some legacy APRS transceivers to connect to the still widely used APRS network.

Hardware
The hardware is build from parts I had already laying around. Some old projects found a new destination and an ancient Raspberry Pi B+ was easily powerful enough to run all the software.
The server is build on two separate boards: the server and peripherals on one board an the router and 2 meter transceiver on another. The router and 2 meter transceiver are optional: the server will still create a Reticulum network on LAN and rnode without it. But having the 2 meter transceiver and especially the router makes the network much more useful. It creates a wifi access point and adds four LAN ports to the mix.


Rnode
A LilyGO LoRa32 v2.1 (also known as TTGO T3 v1.6.1) is used as an rnode modem.
GPS
The generic GPS receiver is connected via USB. The server does not utilize the PSS signal. But it’s still accurate enough even for use as the clock for js8call. I use an external antenna to improve reception.
LoRa APRS transceiver
This design is copied from my Raspberry Pi LoRa shield: https://www.meezenest.nl/mees-elektronica/projects/RPi-LoRa-shield/index.html. The driver is available on my git server:https://git.meezenest.nl/marcel/RPi-LoRa-KISS-TNC. I just connected the Ra-02 LaRa transceiver to the Raspberry Pi. The other parts (NE555, transistors and LEDs I did not use).
1200 bd APRS modem
This is also an old design of mine: https://www.meezenest.nl/mees-elektronica/projects/packetmodem_nano/index.html.
2 meter transceiver
For this project I used an old Baofeng UV-5RE. But any old handheld will do.
Router and wifi access point
I’ll bet you have a box full of old network gear. I certainly have. So I used an old Sitecom router with build in wifi access point. But as a ham you might want something more appealing. So go ahead and buy a Mikrotik.
Software
I tried to document the installation of the software as best as I could. A little Linux experience will come in handy.
Prepare
Install RPi as usual
Install pip and rns
sudo apt-get install pip
sudo pip install rns –break-system-packages
Install openssl1.1
sudo apt-get install libssl1.1
Prepare rnode
rnodeconf /dev/ttyACM0 –autoinstall
Start rnsd for the first time
This creates the config file. CTRL-C to end the program.
Configure Reticulum
$ nano ~/.reticulum/configEnable transport mode
[reticulum]
enable_transport = True
Add TCP interface to config file
# RNS Nederland ( als test 'core-server' )
[[RNS Netherlands]]

type = TCPClientInterface
interface_enabled = true
target_host = nl.rns.hamesh.eu
target_port = 8694
name = RNS Netherlands
selected_interface_mode = 1
configured_bitrate = None
mode = roaming

#[[RNS PE1RXF]]
#type = TCPClientInterface
#interface_enabled = true
#target_host = 192.168.88.14
#target_port = 4242
#name = RNS PE1RXF
#selected_interface_mode = 1
#configured_bitrate = None
# This interface can come and go
#mode = roaming
Add rnode interface to config file
[[RNode LoRa Interface]]
type = RNodeInterface

# Enable interface if you want use it!
interface_enabled = True

# Serial port for the device
port = /dev/serial/by-path/platform-20980000.usb-usb-0:1.2:1.0

# It is also possible to use BLE devices
# instead of wired serial ports. The
# target RNode must be paired with the
# host device before connecting. BLE
# devices can be connected by name,
# BLE MAC address or by any available.

# Connect to specific device by name
# port = ble://RNode 3B87

# Or by BLE MAC address
# port = ble://F4:12:73:29:4E:89

# Or connect to the first available,
# paired device
# port = ble://

# Set frequency to 434.25 MHz
frequency = 434250000

# Set LoRa bandwidth to 125 KHz
bandwidth = 125000

# Set TX power to 17 dBm (50 mW)
txpower = 17

# Select spreading factor 8. Valid
# range is 7 through 12, with 7
# being the fastest and 12 having
# the longest range.
spreadingfactor = 8

# Select coding rate 6. Valid range
# is 5 throough 8, with 5 being the
# fastest, and 8 the longest range.
codingrate = 6

# You can configure the RNode to send
# out identification on the channel with
# a set interval by configuring the
# following two parameters.

id_callsign = PE1RXF-0
id_interval = 600

# For certain homebrew RNode interfaces
# with low amounts of RAM, using packet
# flow control can be useful. By default
# it is disabled.

# flow_control = False

# It is possible to limit the airtime
# utilisation of an RNode by using the
# following two configuration options.
# The short-term limit is applied in a
# window of approximately 15 seconds,
# and the long-term limit is enforced
# over a rolling 60 minute window. Both
# options are specified in percent.

# airtime_limit_long = 1.5
# airtime_limit_short = 33

# This interface is a gateway to other parts of the network
mode = gateway
Add TCP Server interface
[[TCP Server Interface]]
type = TCPServerInterface
interface_enabled = True

# This configuration will listen on all IP
# interfaces on port 4242
listen_ip = 0.0.0.0
listen_port = 4242

# Alternatively you can bind to a specific IP
# listen_ip = 10.0.0.88
# listen_port = 4242

# Or a specific network device
# device = eth0
# port = 4242
Start rns at boot
$ crontab -eAdd
# Start Reticulum daemon
@reboot /home/marcel/.local/bin/rnsd -s
##LXMF propagation node
$ pip install lxmfEdit ~/.lxmd/config
[propagation]
# Whether to enable propagation node
enable_node = yes
Verlaag eventueel de announce time.
Start at boot
$ crontab -eAdd
# Start LXM daemon in propagation mode
@reboot /home/marcel/.local/bin/lxmd -p -s
Nomad Network Node
$ cd ham
$ git clone https://github.com/SebastianObi/RNS-Tools.git
$ cd RNS-Tools/rns_server_page/
$ python rns_server_page.py
Edit .config/rns_server_page/config.cfg.owr
[rns_server]
display_name = PE1RXF_Portable_Nomad_Network_Node

announce_startup = Yes
announce_startup_delay = 0 #Seconds

announce_periodic = Yes
announce_periodic_interval = 120 #Minutes
Add index.mu at /home/marcel/.config/rns_server_page/pages
Add to crontab
# Start Nomad Network Node
@reboot /usr/bin/python3 /home/marcel/bin/rns-tools/rns_server_page/rns_server_page.py -s
AX.25 support
$ sudo apt-get install libax25 ax25-apps ax25-tools
$ sudo nano /etc/ax25/axports
add:
aprs_1200bd     PE1RXF-10        9600    255     2       144.800 MHz APRS (1200 bps)
aprs_lora       PE1RXF-11        9600    255     2       433.775 MHz APRS (LORA)
Some commands must be called as sudo
but we don’t want to enter the password all the time. Especcially at boot time!
$ sudo visudoAdd:
marcel ALL = (root) NOPASSWD: /usr/sbin/kissattach
marcel ALL = (root) NOPASSWD: /usr/sbin/kissparms
marcel ALL = (root) NOPASSWD: /usr/bin/socat
1200bd packet modem
$ mkdir ham
$ cd ham
$ mkdir aprs_modem
$ nano ~/ham/start_aprs_modem.sh
Add (make sure USB port is correct):
##!/bin/bash

echo "Starting 1200bd aprs modem."

# Packet modem uses a CS340 chip, which does not have a serial number. If other USB devices
# with a CS340 chip are pluged in the software cannot distinquish between the various devices.
# But the modem is always connected to the same physical USB port. Use this port number
# instead of /dev/USBx.
serial_port=$(readlink -f /dev/serial/by-path/platform-20980000.usb-usb-0:1.5:1.0-port0)
# Set serial port in RAW mode. Otherwise some charcters may be lost to the modem.
/usr/bin/stty -F $serial_port raw
sleep 1
sudo /usr/sbin/kissattach $serial_port aprs_1200bd
sleep 1
sudo /usr/sbin/kissparms -p aprs_1200bd -t 500 -s 200 -r 32 -l 100  -f n
Make file executable:
$ chmod u+x ./start_aprs_modem.shLoRa APRS modem
$ sudo apt-get install git
$ sudo raspi-config
Enable SPI
$ sudo apt-get install socatclone LoRa driver:
$ cd ham
$ git clone https://git.meezenest.nl/marcel/RPi-LoRa-KISS-TNC.git
In start_all.sh the line with socat probably says ax2, change to aprs_lora.
GPIO edge detect in python doesn’t work in bookworm: do this to make it work again:
$ sudo apt remove python3-rpi.gpio
$ sudo apt install python3-rpi-lgpio
Set varialble in ~/.bashrc. Only on original Rasberry Pi B+.
$ export RPI_LGPIO_REVISION='c03114'Auto start at boot
Make file ~/ham/start_rf_interfaces.sh and add:
#!/bin/bash

# Start 1200bd APRS modem
/home/marcel//ham/aprs_modem/start_aprs_modem.sh

# Start LoRa APRS modem
# export only on original Rasberry Pi B+.
export RPI_LGPIO_REVISION='c03114'
/home/marcel//ham/RPi-LoRa-KISS-TNC/start_all.sh
Add to crontab
@reboot sleep 60 && /home/marcel/ham/start_rf_interfaces.shInstall GPS
We are not using PPS, so the accuracy is not that great, but good enough for use with FT8 or JS8CALL
$ sudo apt-get install gpsdEdit /etc/default/gpsd so it looks like this:
# Default settings for the gpsd init script and the hotplug wrapper.

# Start the gpsd daemon automatically at boot time
START_DAEMON="true"

# Use USB hotplugging to add new USB devices automatically to the daemon
USBAUTO="true"

# Devices gpsd should collect to at boot time.
# They need to be read/writeable, either by user gpsd or the group dialout.
#DEVICES="/dev/serial/by-path/platform-20980000.usb-usb-0:1.3:1.0-port0"

# Other options you want to pass to gpsd
GPSD_OPTIONS="-n"
Make shure it starts at boot:
sudo ln -s /lib/systemd/system/gpsd.service /etc/systemd/system/multi-user.target.wants/Reboot system
Check if everthing works:
$ sudo service gpsd status
$ gpsmon
Setting up NTP
Edit /etc/dhcp/dhclient.conf and remove sntp-servers and ntp-servers. This is mine after removing those parts:
option rfc3442-classless-static-routes code 121 = array of unsigned integer 8;

send host-name = gethostname();
request subnet-mask, broadcast-address, time-offset, routers,
        domain-name, domain-name-servers, domain-search, host-name,
        dhcp6.name-servers, dhcp6.domain-search, dhcp6.fqdn,
        netbios-name-servers, netbios-scope, interface-mtu,
        rfc3442-classless-static-routes;
Delete the following files:
/etc/dhcp/dhclient-exit-hooks.d/ntpsec
/run/ntpsec/ntp.conf.dhcp
Install NTP
$ sudo apt-get install ntpEdit /etc/ntpsec/ntp.conf and add the following lines to the end of the file:
At the end of this file we will add our GPS using pseudo addresses which refer to shared memory addresses - any other method of getting these timing is not fast enough. Microseconds count here, so we will read the time directly out of memory! I’m using Johannes Weber’s settings, which seem to work well.
# gpsd clock via shm
server 127.127.28.0 minpoll 4 maxpoll 4 prefer
fudge 127.127.28.0 time1 +0.130 refid GPS flag1 1
Comment out the following line. This will let ntp use the gps clock as the only source. This is important when there is no internet connection.
#tos minclock 4 minsane 3Restart and test
$ sudo systemctl restart ntp
$ ntpq -p

 remote           refid      st t when poll reach   delay   offset  jitter
==============================================================================
0.debian.pool.n .POOL.          16 p    -   64    0    0.000   +0.000   0.001
1.debian.pool.n .POOL.          16 p    -   64    0    0.000   +0.000   0.001
oPPS(0)          .PPS.            0 l    8   16  377    0.000   +0.037   0.003
*SHM(0)          .GPS.            0 l    7   16  377    0.000  +13.835   0.637
-time.rdg.uk.as4 67.92.135.130    3 u   27   64   77   31.574   -7.645   1.265
+ns1.do.steersne 157.44.176.4     2 u   27   64   77   31.283   -7.389   1.659
-x.ns.gin.ntt.ne 249.224.99.213   2 u   24   64   77   36.340   -8.447   1.979
-195.219.205.9   195.219.14.21    2 u   29   64   77   34.430   -6.360   1.983
+85.199.214.101  .GPS.            1 u   24   64   77   39.596  -10.702   3.007
-ferrars.curadig 131.188.3.223    2 u   21   64   77   35.906   -7.929   3.018
-ns4.turbodns.co 90.187.99.165    2 u   22   64   77   37.696   -8.412   3.140
Note the o symbol (= PPS peer when the prefer peer is valid) before the PPS, as well as the * symbol (= system peer) before the SHM; refer to Peer Status Word. These symbols must be present. Otherwise your instance is not working correctly, which would show an x instead. As we don’t have PPS active, we can ignore this line.
Calibrate GPS time
The offset of the GPS might be to high for ntp to use it. This is indicated by an X in front of the SHM(0) line. Tweak the time1 setting in the fudge line of /etc/ntpsec/ntp.conf, restart the service by executing sudo service ntp restart, check offset with ntpq -p and repeat until there is either a + or ideally an * in front of SHM(0).
fudge 127.127.28.0 time1 +0.190 refid GPS flag1 1Create position beacons for APRS
$ pip install py-gpsd2 --break-system-packagesInstall gps_beacon from the git server of Mees Electronics: https://git.meezenest.nl/marcel/get_gps_position
Add beacon_scripts to crontab, for example every 30 minutes
Known issues
GPS time
Without an RTC in the Raspberry Pi, every time the system reboots the system clock is far behind the time of the GPS receiver. Therefore, NTP will not accept the GPS as a correct time source. The temporary solution is to manually set the system time:
$ sudo timedatectl set-time '2024-09-07 11:24:00'Make sure the time is within 1000 seconds (approximately 16.67 minutes). If the difference exceeds this limit, NTP will not synchronize and will show the “difference limit exceeded” error.
Next, you can manually synchronize the clock using:
$ sudo systemctl restart ntpA permanent solution would be to install an RTC.
GPS location
On the 32 bit version of Raspberry OS (bookworm), there’s a bug in gpsd (version 3.22): the position is not updated after the first fix. A possible solution is to compile a newer version of gpsd yourself, but that’s a pain. The best solution overall is not to use an ancient Raspberry Pi B+, but a more recent Raspberry Pi 4 or a Zero 2W with a 64 bit OS.
Links
Website of the creator of Reticulum
License
Copyright (C) 2025 M.T. Konstapel
The software is published as open-source software (GPL). The hardware is published as open-source hardware (OSH).
Software
This program is free software: you can redistribute it and/or modify it under the terms of the GNU General Public License as published by the Free Software Foundation, either version 3 of the License, or (at your option) any later version.
Hardware and documentation
This work is licensed under a Creative Commons Attribution-ShareAlike 4.0 International License.